
This guide will walk you through setting up the development environment, downloading the source code, compiling, and building openvela on Ubuntu 22.04, and finally running the build artifacts using the Vela Emulator.
Environment Requirements
This guide is only for Ubuntu 22.04. Compiling in Windows Subsystem for Linux (WSL) or Docker container environments is not supported.
Step 1: Preparations
Before you begin, please ensure your development environment meets the following requirements.
1. Hardware Requirements
- Hard drive: At least 40 GB of free space for the source code and build artifacts.
- Memory: At least 16 GB of RAM.
2. Operating System Requirements
- Operating System: Ubuntu 22.04 (arm64/x86_64)
3. Install Development Tools
Before you start, you need to install the necessary packages for compiling openvela.
Open a terminal and run the following commands to update the package list and install Git, CMake, Python 3, and the build-essential toolchain.
sudo apt update
sudo apt install git cmake python3 build-essential
4. Install Git LFS
Note: This project contains large binary files (e.g., model weights, datasets). You must configure Git LFS; otherwise, the pulled files will be corrupted (appearing as mere text pointers of a few KB) and the project will fail to run.
Please run the following commands in your Ubuntu terminal to install and initialize:
# Step 1: Configure the official repo and install (ensures the latest version)
curl -s https://packagecloud.io/install/repositories/github/git-lfs/script.deb.sh | sudo bash
sudo apt-get install git-lfs

# Step 2: Initialize configuration (Important: You must run this, otherwise LFS will not work)
git lfs install
Step 2: Download the Source Code
openvela uses the repo tool to manage its source code, which is distributed across multiple Git repositories.
1. Install the Repo Tool
repo is a repository management tool built on top of Git. Run the following commands to securely download and install it.
curl -sSL "https://storage.googleapis.com/git-repo-downloads/repo" > repo
chmod +x repo
sudo mv repo /usr/local/bin
After installation, you can run repo --version to verify it.
2. Initialize and Sync the Repository
-
Create a working directory to store all of openvela's source code.
mkdir openvela && cd openvela -
Initialize the project manifest using repo and specify the trunk branch.
Please select one of the following methods (SSH is recommended) based on your network environment and preference to initialize the repository.
Option A: Download from GitHub
-
Method 1: SSH (Recommended)
This method requires you to add your SSH public key to your GitHub account first. Please refer to the official GitHub documentation.
repo init -u ssh://git@github.com/open-vela/manifests.git -b trunk -m openvela.xml --repo-url=https://mirrors.tuna.tsinghua.edu.cn/git/git-repo/ --git-lfs -
Method 2: HTTPS
repo init -u https://github.com/open-vela/manifests.git -b trunk -m openvela.xml --repo-url=https://mirrors.tuna.tsinghua.edu.cn/git/git-repo/ --git-lfs
Option B: Download from Gitee
-
Method 1: SSH (Recommended)
This method requires you to add your SSH public key to your Gitee account first. Please refer to the official Gitee documentation.
repo init --u ssh://git@gitee.com/open-vela/manifests.git -b trunk -m openvela.xml --repo-url=https://mirrors.tuna.tsinghua.edu.cn/git/git-repo/ --git-lfs -
Method 2: HTTPS
repo init -u https://gitee.com/open-vela/manifests.git -b trunk -m openvela.xml --repo-url=https://mirrors.tuna.tsinghua.edu.cn/git/git-repo/ --git-lfs
Option C: Download from GitCode
-
Method 1: SSH (Recommended)
This method requires you to add your SSH public key to your GitCode account first. Please refer to the official GitCode documentation.
repo init -u ssh://git@gitcode.com/open-vela/manifests.git -b trunk -m openvela.xml --repo-url=https://mirrors.tuna.tsinghua.edu.cn/git/git-repo/ --git-lfs -
Method 2: HTTPS
repo init -u https://gitcode.com/open-vela/manifests.git -b trunk -m openvela.xml --repo-url=https://mirrors.tuna.tsinghua.edu.cn/git/git-repo/ --git-lfs
-
-
Execute the sync command. repo will download all related source code repositories according to the manifest file (openvela.xml).
repo sync -c -j8
Tip
- The initial sync can be time-consuming, depending on your network connection and disk performance.
- If the sync is interrupted due to network issues, you can run repo sync again to resume.
Step 3: Compile Source Code
After downloading the source code, execute the following compilation steps in the openvela root directory.
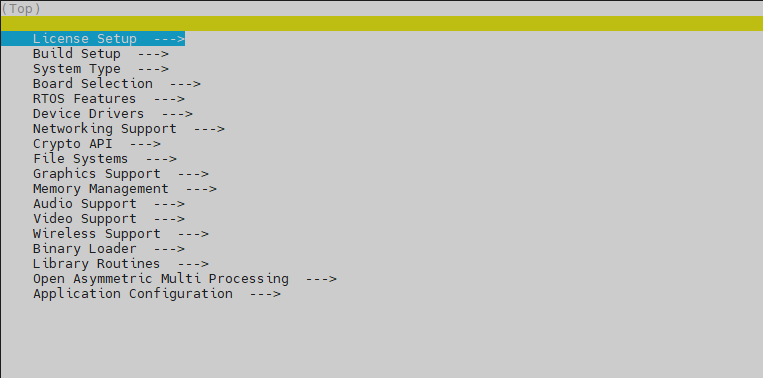
1. (Optional) Custom Kernel Configuration
You can use the menuconfig command to open a graphical interface to adjust the NuttX kernel and component configurations.
./build.sh vendor/openvela/boards/vela/configs/goldfish-arm64-v8a-ap/ --cmake menuconfigOperation Tricks
- Press / to search for configuration items.
- Press Space to toggle selection status (Enable/Disable/Modularize).
- After configuration, select Save to save and exit.
2. Execute Compilation
Execute the following command to build the entire project.
./build.sh vendor/openvela/boards/vela/configs/goldfish-arm64-v8a-ap/ --cmake -j$(nproc)Upon successful compilation, you will find build artifacts such as nuttx in the cmake_out/vela_goldfish-arm64-v8a-ap directory.

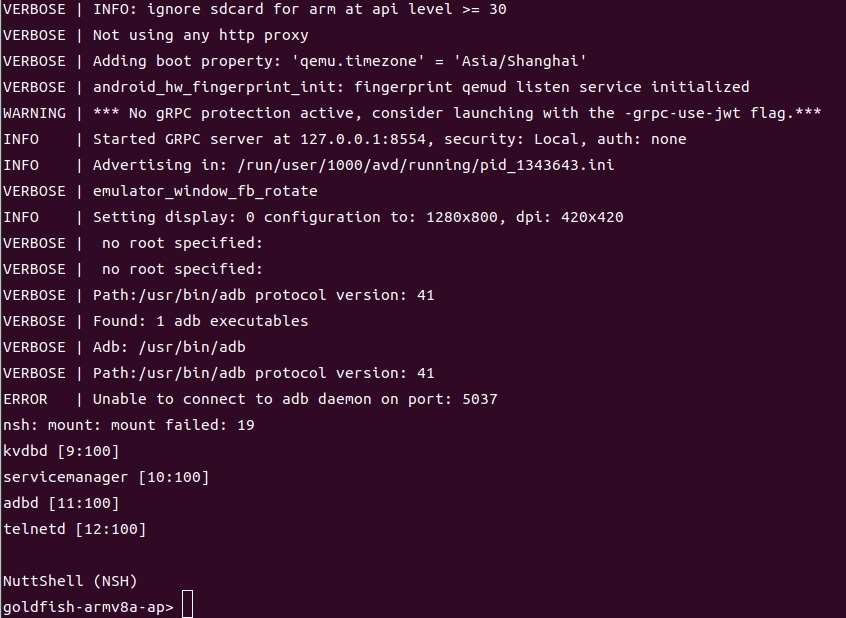
Step 4: Run Emulator
In the openvela root directory, execute the following script to start the Vela Emulator and load your build artifacts.
./emulator.sh cmake_out/vela_goldfish-arm64-v8a-ap/After the emulator starts, you will see the goldfish-armv8a-ap> prompt, indicating that openvela has run successfully.
Next Steps
-
Frequently Asked Questions
-
Further Reading